Friday, December 17, 2010

Christmas Shop Window Card


Window Shop Card Supply List


Tools Needed

Modern Label Punch
Designer Label Punch
Word Window Punch
Scallop Edge Punch
Paper Trimmer
Bone Folder
Big Shot Machine
Square Lattice Embossing Folder
Dazzling Diamonds
Snell Adhesive
Sticky Strip
2 Way Glue
Stamp -a-ma-jig
15 inches of Very Vanilla 1/4 Grosgrain Ribbon
Stamp Sets Needed

A Cute Christmas - hanging Christmas Ornaments
Teeny Tiny Wishes - Merry Christmas

Markers Needed
Cherry Cobbler
Old Olive
More Mustard

Ink Pads

Classic Black Ink Pad

Paper Needed

Old Olive Cardstock

5 1/2" x 8 1/2", scored at 4 1/2"
1 Designer Label Punched
5 Word Window Punched

Cherry Cobbler Card Stock
2" x 4 1/4", then use scallop punch on one side for awning
3 1/4" x 4 1/4", then use scallop edge on one side
Designer Label Punched

Very Vanilla Card Stock

4 1/4" x 5 1/2"
Word Window punched

This card was orginally created by Elsie Camp.

Wednesday, December 15, 2010

Holiday Treat Purse

Hey Scrappers!
I have been having a blast making new videos using the Jolly Holiday Designer Series Paper! I can't believe how far it has gone! I especially enjoy the ease of using coordinationg papers, punches, stamps and all the other great products from Stampin Up. In this video I have made the cutest purse that holds a gift card, a bag of candy and a place to write a sentiment. Anyone would love this gift! Check it out! Let me know what you think. I had to edit it quite a bit to get it under the 10 minute limit from You Tube. After the video is a list of all the products I used in this video.


Holiday Treat Purses


Supplies Needed


Jolly Holiday Specialty Designer Series Paper #117159
4”x10” - scored at 4” and 6”
Top Note die -cut perforated edge off
1”x1 3/4” piece
2”x4” piece
Owl punched out

Cherry Cobbler Card Stock #119685
2” Scallop Circle Punched
Owl Punched for hat and coat

Old Olive Card Stock #100702
4 1/4” x 10” - Scored at 4” and 6”
Top Note Die cut

Very Vanilla Card Stock #101650
1 3/4 Circle
3 1/2” x 3 1/2”

Tools Needed

Paper Cutter #104152
Scissors
Multi Purpose Liquid Glue (Mono) #110755
Snell Adhesive #104332
Stampin Dimensionals #104430
Sticky Strip #104294
Two Step Owl Punch XL #118074
1 3/4” Circle Punch XL #119850
2” Scallop Circle Punch (not current) substitute with Circle Scissors Plus #112530
Itty Bitty Shapes Punch Pack (flower punch) #118309
Big Shot Machine #113439
Bigz Top Note Die #113469
2 Medium Googly Eyes
Bone Folder #102300
5/8” Old Olive Satin Ribbon 10 inches #117292
Velcro Dot
Cellophane Bag #102757

Note - you can use any combinations of the above papers to create this project. I will list exactly what I used.

I hope you enjoyed the video!

Until Next Time,
Happy Scrappin!

Tuesday, December 14, 2010

Filled With Love Promotion Start December 17th!


contact information:

This Valentine’s Day, give yourloved ones a beautiful handmade gift using products from Stampin’ Up!
December 17–January 24, get a FREE package of Bitty Buttons when you purchase a Filled with Love Bundle, including the Filled with Love Stamp Set and exclusive Love Patterns

Designer Series Paper Pack—only available through this special promotion!

CONTACT ME TODAY TO ORDER YOUR BUNDLE AND
GET FILLED WITH LOVE—AND BITTY BUTTONS!

December 17th to January 24, 2010

Thursday, December 9, 2010

Birth Right Of Memphis Scrapbook Class Photos

Hey Scrappers,

Well the first session of scrapbook classes came to an end last week.  It was so much fun to share in the wonderful experience with these young mothers.  When the class started, the women were all so shy and reserved but by the end we were all laughing and having a great time.  Everyone finished their baby's "life book" and it was so special.  Since I have shared some about what Birth Right was about and asked for donations, I wanted to share with you all some of the photos of the ladies scrapbook pages.  I purposely did not include photos of the ladies to protect their privacy, I did want to show you some photos. 


Here are some of the layouts I did as samples for the ladies to get some inspiration.


My Head Is Swimming With Great Ideas!

Hey Scrappers!

Wow I have been a very busy bee lately.  I have three new videos!  I finally figured out how to do them and get them uploaded in a timely manner … LOL!  What a learning curve that has been.  But I really do enjoy learning new things and expanding my knowledge.  I still have a lot to learn but hopefully the finish product will show my efforts. 

I have so many things going on in my head about how I want to develop my Stampin’ Up! business, I just don't hardly know where to start.  I have been pondering what type of workshops I would like to have, such as:

Beginners Workshops – to learn basics of stamping and scrapbooking
Project Workshops – to make 3 awesome projects like the ones in my videos
Techniques Workshops – to teach some advanced techniques
Digital Workshops – to teach My Digital Studio techniques and projects
Monthly Clubs – to do an assortment of projects and techniques

Also, my mind is swirling with ideas for my online readers and YouTube audience such as:

Monthly Kits – to make the some of the projects in my video tutorials
Frequent Buyers Club – that allows you to earn free stamp sets at my expense!
More videos – for projects, techniques, digital projects

And this is just off the top of my head!!  It will take time to implement all these ideas, but hang tight it will happen. It is a wonder I sleep at all with all the ideas swimming around in my head.  I know it sounds crazy but I dream of stamping and scrapbooking all the time!  LOL!  Yesterday I got "My Digital Studio" from Stampin’ Up! and I dreamed about it all last night!  I have to admit it is way too cool!  I was so surprised how many design elements came with it.  If you want to do a quick scrapbook or cards that is the way to go!  I was so amazed at how easy it is.

Needless to say I am so excited about this new phase of my life.  I can't believe I am so fortunate to be able to do what I love and make money too.  What a blessing!  I know I haven't been making a lot of posts on the blog lately but I am working hard to get everything set up!  Thank you all for your loyalty and I wanted you all to know what is going on with me and my new business! 

I will soon post links to my Stampin’ Up! website on all the video tutorials to show all the products used in the videos.  I just couldn't want for you all to get to see them.  If you would like to be the first to see my videos subscribe to my YouTube Channel - sharonsscrappyspace.

If you would like to purchase any Stampin’ Up! products visit my Stampin’ Up! Store 24/7 at
Sharon's Scrappy Space at Stampin’ Up!  You can read my blog from there and check out my project ideas, get detailed list of products I used in videos, see catalogs online, and shop, plus a lot more.  Check it out.

Until Next Time,
Happy Scrappin’

Matchbox Christmas Boxes

Jolly Holiday Gift Card Holders

Smorgasbord of Santas

Sunday, November 28, 2010

Snow Swirled Christmas Card

Hey Scrappers
Check out my very first tutorial video on this lovely Christmas card made with the Stampin Up "Snow Swirled" Stamp set.  When I saw this stamp set I knew I had to have it! 


Stampin Up Products Needed for this card are:

Snow Swirled Stamp Set - Tree Stamp
Very Vanilla Card Stock cut at 5 1/2 x 8 1/2, scored at 4 1/4;  and
    another piece cut at 5 x 3 3/4
Night of Navy cut at 5 1/4 x 4
Night of Navy Classic ink pad
2 way glue
Dazzling Diamonds

Santa Gift Card Holder

Check out this adorable Santa Christmas gift card holder video!

To make this Santa gift card you will need the following Stampin Up products:

Big Shot Die Cutting Machine
Bigz Shot "Scallop Envelope" die
1 3/4" - "Scallop Circle" extra large punch
1/4" - standard office hole punch
"Itty Bitty Circle" punch
"Ornament" punch
Scissors
Mono Adhesive
Snail Adhesive
Sticky Strip
Signa Uno-Ball White pen
Paper trimmer
Small Dauber
Croc-A-Dile
Classic Pretty In Pink ink pad
Real Red paper cut at - 5 1/2 x 4 1/4, small office punch circle, wedge cut
Pretty In Pink paper cut at - Ornament punch, 3 Itty Bitty Circle punches
Whisper White paper cut at-1 3/4" Scallop Circle punch piece, 3 Itty Bitty hole punches,   
    3/8" x 2 strip
Basic Black paper cut at - 2 1/4 long thin strip that will fit into the Croc-A-Dile large hole  
    punch, 1 small office sized hole punch
More Mustard paper - 3/8" x 1" strip of paper

Tuesday, November 23, 2010

YouTube Account Changed

Hey Scrappers

Wow have I been busy!   I am getting settled into my new role as a Stampin Up Demonstrator!  I have done a couple videos and this one is my latest.  It is my very first tutorial video!  Wow I had to do 5 cards to get it right.  Cuddos to those who have done many videos and make it look very easy!  I am sure it will get easier with time and more videos LOL!  At least now I have figured out how to upload them without dozens of failed attempts!  I hope you enjoy the video and I will have more to come. 

If you have subscribed to my youtube account, I have had technical difficults and can't log in to my shargod account anymore.  After trying everything I can think of, I finally gave up and created a new account. You can still see my old account I just can't add anything to itI am sorry for any inconvenience this might cause but I hope you will check out my new youtube account.

My new account is http://www.youtube.com/user/sharonsscrappyspace

Until next time
Happy Stampin!

Saturday, November 13, 2010

Bargain Alert - Check Out My Stampin Up Starter Kit

Hey Scrappers and Stampers!

I just got my Stampin Up Starter Kit and wanted to take the opportunity to show you what comes in it. I customized my starter kit and chose stamp sets and ink pads based on that I already had in my supplies. I still can't believe that Stampin Up is going to offer their Stampin Up Starter Kits for only $87.50 from Nov 15 thru the 30th! If you have ever thought of becoming a demonstrator now is the best time to do so. Stampin Up has never offered this kit at such a low price. It is valued at $310 and you can get it for only $87.50! That is why I am making it my bargain alert.

If you are like me, I thought to be a Stampin Up Demonstrator you had to do workshops in other peoples homes and club meetings at my house. But in reality many become demonstrators simply for the savings on all their Stampin Up supplies. Even as a Demonstrator, when you make an order you get the same benefits as a hostess! I placed my first order yesterday and when I hit continue it prompted me to select free products! I thought.. I did do this order as a Demonstrator didn't I?? I talked to my upline Demonstrator and she said it wasn't a mistake if you spend at least $150 you get a free stamp set! Duh I would have done this a long time ago had I known all that. LOL  The more you buy the more you get free plus you get 30% off your first order if you order it within 45 days of becoming a Demonstrator.  After that you get 20% off all products and promotions!  You will get 8 catalogs in your starter kit, just give them to your scrapping friends or family and let the products sell themselves. 

I had thought about doing this for a long time and didn't want to harrass my friends and family into hosting parties and trying to get them to buy stuff from me.  But my friend gave me a catalog and I realized I wanted this stuff and she didn't say anything about to me about it.  It literally sold itself and even if I don't make much money doing this, I will get a great discounts and help support my own addiction..oops I mean hobby.  LOL

Email Me if you would like to get more information about Stampin Up or ready to start saving money on your Stampin Up products by becoming a demonstrator.   Check out the next article to find links to geting your own starter kit!

Check out my video of what I got....

Friday, November 12, 2010

Stampin' Up! Demonstrator Kits 1/2 Off!!!


Hey Scrappers!

Check out this awesome deal!  Stampin Up is offering 50% off  on the Demonstrator Starter Kit!  This special promotion runs from November 15 through November 30, 2010.  During this time you can purchase the Standard or Digital+ Starter Kits for only $87.50 -- that is 50 percent off the regular price of $175.  This kit has $310 worth of paper or digital crafting and business supplies!  The best part is that you can totally customize your kit by choosing the Stampin Up products that you want.

I encourage you to take advantage of this never-before-seen offer before it ends on November 30, 2010! 

This opportunity is great for the hobby stamper! The starter kit is not only a fantastic savings, it includes the benefits and discounts of being a Stampin' Up! demonstrator with no obligation to sell. You'll enjoy full demonstrator privileges thru March 31, 2011. To remain active beyond March 31, 2011, $300 in product sales is required.

Interested in Stampin' Up! as a business? I can help you grow your business to be whatever you want it to be! Pay for your hobby, pay for your holiday shopping, pay your bills... the more you put into it, the more you get out of it!

Interested? I would love to have you on my team. It's simple to sign up on-line. Click here to E-mail me for more details!

Friday, October 29, 2010

Carolyn’s New Scrapbook Room

Earlier, I wrote an article about my friend, Carolyn, who was moving her scrapbook room from a small bedroom to her huge bonus room upstairs.  Click here to see before photos.  Carolyn did a buy few things to prepare her space for the move, and she did it all on a budget!  She purchased a kitchen island from Big Lots for $300, she now uses as her cutting station.   She bought 4 small black bookshelves along the wall in the 1st photos for $15 each at Wal-Mart.  She also bought a couple of the stackable plastic Sterite 3 drawer storage units and apple green paint to paint the room.  The best part was she paid her grandson $10 a hour to carry it all upstairs!  She said he ran up and down stairs for a hour and a half like it was nothing.  She gave him $15 and some change she had left over from a garage sale, what a deal!  Next time I need a bunch of stuff I will hire him any day!  So she transformed her room for under $500!  Which is awesome! 

IMG_3028IMG_3025 


As you enter her room, the long wall of the black bookshelves is the first thing you see.  She has tons of paper, embellishments, ribbons, and all kinds of goodies along the wall.  In the white paper trays to the left of the 1st photo is paper, that her friends can use when they come over to scrapbook!  On the to the left is a short wall and here she has metal paper racks that she has used to put all her idea books in cute little baskets. 

IMG_3024 IMG_3023

In the picture above you can see the awesome island she got at Big Lots.  It has a butcher block top, with a small piece of granite that she can use for all her cutting needs.  Here she keeps her Cricut Expression, Cuttlebug and Sizzix with all the accessories here.  In the next photo is her daughter Debbie’s storage area and she has several of the Jet Max cubes that she got from Michaels.  They cost $29.99 each but you can find them for 40% off pretty often.  So for under $200, you could have all this great storage too!  Plus you don’t have to buy them all at once, you can buy a few at a time as your budget allows. 

IMG_3027

IMG_3035

Above is her scrapping area.  She has 3-4x2 foot tables together to form a large work area. So she always has room for her friends to join her for the Friday Night Crop.  She has her most used items located along the right wall behind her piano bench she sits on the scrap.  Of course the piano bench is full of goodies too.  

IMG_3032IMG_3036

This is the far left wall close to the window, here she has a desk with her printer and more Sterile containers to store more supplies.  I missed getting photos of the rest of the wall, but she has a TV in a entertainment cabinet and her sewing machine.  I honestly am amazed she knows where everything is, but she does. 

Great job Carolyn, your room looks great!  Thank you for letting me share in this experience with you and allowing me to share it with my readers!  I look forward to scrapping with you in your new room!

Until Next Time,

Happy Scrappin and Stampin!

Wednesday, October 20, 2010

Where I Am Headed!

Hey Scrappers and Stampers!

Currently I am sold out of merchandise!  But don't fear I have another deal working!  I have decided to become a Stampin Up Demonstrator and only sell Stampin Up new and retired merchandise.  It will be the best of both worlds!  As you all know I love Stampin Up products and the quality is superb.  I will still scope out great bargains on Stampin Up products and pass them along to yo.  I will also continue to share great organizational tips because I am so passionate about them both.  For now I will still have my salesroom upstairs and stock it with great SU retired products.  I have to admit the SU products have been my best selling items.

It is an exciting move and I am looking forward to it, I have thought about this for a long time now and the only thing that was holding me back was all the merchandise I still had. But now that it is sold, I feel it is a sign to move into this new chapter of my life. I will officially get started in November as a Stampin Up Demonstrator and have Stampin Up (SU) Club at my home twice a month. It will be great fun and I look forward to sharing ideas and techniques at SU Club meetings. Don't worry I won't be bugging anyone to do parties at their homes, since all clubs will be here.  I will give opportunities to club members to earn free stamp sets and other Stampin Up merchandise.

But don't feel left out if you are out of town or can't come to club meetings because I am going to start doing videos to share the same techniques and Stampin Up products with you, it will be like SU Club online!  I will have offers for you to earn free SU merchandise as well.  I will have to work on a catchy name though. Maybe something like...Stampin Up With Sharon or Stampin At Sharon's or Stampin at Sharon's Scrappy Space, hmmm I will have to work on that. Hey I have an idea, share your ideas with me on what you think I should call the SU club and my online club featuring technique videos.  If I choose the name you submitted, I will send you a new Stampin Up basket of goodies.  
I have been very busy working out all the details to get started and getting everything lined up.  I have had a time trying to figure out how to upload videos to Youtube. First, I had to get a video camera, then I had to figure out how to work it. Believe doing a video isn't easy, even with about 100 takes.  I went through several video editing software trial versions to figure out which was best for me not to mention figuring how to use them.  (I should remind you that you should always save your files often!!!)  I lost a few of my edited video files when the software crashed on me!!  It still hasn't gotten to that point where "this will be funny one day" but hopefully it will be some day once I conquer the video upload thing! Then I had my Internet go down and kept getting thrown offline. Whew I am tired just thinking about it all!  It has been a real learning curve for me but I am pretty tenacious!  Well finally today I am trying to upload a video again and it is now processing it. I am anxiously waiting to see if it will finally work or not!  If it finally uploads, I will be thrilled beyond measure! If not you won't read this today! I am hoping to include the video link here. Still waiting, it can take hours I am told. It has never gotten to the point of processing the video before so I am further along than any of the other of my 100 attempts to upload a video.  Wait, wait....I can't believe it but I have success!  Yeah!!!!  Excuse me for a minute while I dance around the room!!!!.......  Ok check out my video tour of my scrapbook room.  I have some surprises....


What did you think about that?  Don't you just love my new ink pad shelf???  What a deal it was!!!  I absolutely love it!  Painting it wasn't so fun but well worth it.  My husband mounted it to the wall so I can easily pull out the table to have club or just enjoy scrapping and stamping with my grandkids or scrapbuddies.   What do you think about all the paper storage going vertical?  I love it I have so much more room now!  I love the way the horizontal storage looked before but it sure took up a lot of space and as you know all space in a scraproom is valuable.

I am also thinking of unmounting all my wood stamps!  What do you think about that?  I am making a purchase soon from a retired SU demonstrator and she has done just that.  I am waiting to see what my customers think about the stamps being unmounted, before I do.  But you will see most of my demonstrations online with unmounted stamps.  I am thinking about all the room I will have. 

Thanks for checking out my video and let me know if you can think of a great name for my SU clubs!

Until Next Time
Happy Scrapping and Stamping!

Sunday, October 3, 2010

My Thoughts....To Be Or Not To Be a Stampin Up Demonstrator

Hello Scrappers!

I have been incredibly busy lately!  I have truly enjoyed teaching scrapbooking classes at Birthright of Memphis!  It has its challenges for sure, with so few supplies, but I am still working on that.  Since Birthright has no tools to work with and class time is so short, a mere 50 minutes, I am putting together layout kits for them to assemble.   Birthright is such a worthy organization and it has shown me that I love to teach scrapbooking and stamping.  This week will be the ladies' first attempts at stamping, as we are using the white sheets of paper that came  in their scrapbook albums, and will stamp backgrounds for their layouts. I am having to be very resourceful!  LOL!   This 4-page layout is called "Baby's Firsts" and it will been done over the next two classes.  I am very excited to get them stamping!  When I get all the layouts planned and put together I will post them for all you to see.

Since I love teaching and Stampin Up so much I am seriously considering becoming a Stampin Up Demonstator.  There are very few demonstrators in my local area, with most of them in Memphis, TN.  I am in Horn Lake/Southaven, MS area, which is just south of Memphis across the state line.  Of course, I would still offer my bargain finds, but also include new items from the Stampin Up catalog.  With this in mind, I would also  branch out and start doing some instructional videos of techniques using Stampin Up supplies, and also sharing some organizational tips.  Since I have a second room in my home dedicated to scrapbooking, (my upstairs salesroom), I could have workshops and classes in my home.  Many of you who attended my sale have requested beginner classes to learn how to scrapbook and to learn different basic techniques, so I would also plan on doing those types of classes. Since I love mixing scrapbooking and stampin to make home decor items and cards, I would also have those types of techniques on video as well.  I think it would be great fun and I believe a wonderful opportunity to get to know you all better, whether by internet or locally.   It has been great to get to know you all better and share the same passion for stamping and scrapbooking as I do, and for me that is the best part of having this blog, since it connects me to all of you.

Let me know what you think of this idea that is bouncing around in my head.   Would you be interested in attending a local workshop or class, or seeing technique videos on my blog?   Would any of you be interested in buying Stampin Up products from me as a Stampin Up Demonstrator?   I would like to make an informed decision, and would love to hear what you think about this.  Send me an email at shargod@gmail.com.  I look forward to hearing from you all.

Until Next Time.
Happy Scrapping!!!

Wednesday, September 15, 2010

What I Have Been Up To

Hello Scrappers!

I have to admit I feel like I have been neglecting my blog lately, but life has kept me busy for the last couple weeks.  So I thought I would share with you some of what I have been up to. 

A couple of weeks ago, I got a email from an organization called Birthright of Memphis, and they were looking for someone to teach scrapbooking classes.  It certainly peaked my interest and I called them and went in to talk to their Director, Vickie Hardesty.  She explained what Birthright is all about.  Frankly, I was very impressed, by all they do and decided to volunteer to teach the classes.

Birthright of Memphis is a non-profit organization that helps pregnant women who are low-income and have little or no support from family.  Some of these women have chosen not to have abortions through counseling from Birthright. Birthright helps these women through effective parenting classes, help with finding homes when necessary, help with obtaining higher education, along with providing free counseling and pregnancy testing, etc. The organization helps these women not only through their pregnancies but through the first three years of their child’s life. They provide maternity clothing and clothing for their babies, baby beds and other essential needs for the expectant mother. This is only a small part of the services they offer free of charge to these women.

Birthright of Memphis decided to start these scrapbook classes to help the women bond with their babies by creating a “Life Book” scrapbook for their child. Many of these women don’t have family roots or even see a future for themselves. Birthright is using the creative tool of scrapbooking to give these women hope and a future, giving their babies roots, something that has been missing in many their lives.

The first class was last Tuesday, and it was so much fun and very rewarding.  The women were all so enthusiastic about doing their babies scrapbooks.  It was a big class and out of the 17 women who signed up for the class, 14 came.  I decided to make the layouts kits, to make it easier for them to create their "Life Books".  Let me tell you, I had the Cricut working overtime!  We have a total of 8 classes scheduled and have two-page layouts scheduled for each 50 minute class.  Ok, I know, that is a short time to do it!   I am planning on doing easy layouts that can be put together quickly and what they don't finish in class, they can finish later at home. 

One of my biggest challenges in putting together layouts, was they had very few supplies, to work with.  All the scrapbook supplies for the "Life Books" are donated.  Fortunately, they did have the scrapbook albums already donated, which was a true blessing. Also, Carolyn, whose scrapbook room redo is featured on my blog, donated some paper and a few other things to help out to get me started. Between Carolyn's donation and what I donated, I managed to get 18 layout kits for the first and last pages of the scrapbook put together.  I assembled one of the layout kits to give them an idea of how to start.  I was so impressed, not one woman in the group did their layouts exactly like mine. 

Interestingly enough, the day I called Birthright about the teaching position, I got a call from a Stampin Up Demonstator named Alice.  She had heard through one of my customers, that I was selling scrapbook items for bargain prices and called me.  Alice and I have talked on the phone several times since that first call and eventually I told her about the need for scrapbook supplies for Birthright of Memphis.  Alice jumped in both feet first and started making calls, and one of those calls was to Stampin up headquarters in Utah.  She found out how to request a donation and gave me all the information to do it.  I am so excited to tell you all that Stampin Up approved the request within a couple days!  I don't know what supplies they will send to Birthight but I am thrilled and feel totally blessed. 

Stampin Up is an awesome company who is obviously very generous.   I am so impressed how Stampin Up saw the needs of Birthright of Memphis and got on board to help out.  Thank you so much to Stampin Up for helping out such a worthy cause.

I am so honored to be to be a part of Birthright of Memphis and to be able to share in the experience of these women's lives by helping to create their "Life Book" scrapbooks for their babies.  Through all this, I have realized that through anything we love to do, like scrapbooking, we can make a difference in other people's lives.  One day, these babies will see their roots through their "Life Books".  How amazing is that?  I never dreamed when I started this blog and the mission to help offer affordable scrapbook supplies to women who might not be able to scrapbook otherwise, it would take me in the direction it has. 

Thank you again to Stampin Up, Alice and Carolyn for donating your time, efforts and supplies to help out for this worthy cause!  I hope that you all will be truly blessed for your efforts.

If you have donations you would like to make to Birthright of Memphis or you would like to know more about them, check out their website: http://www.birthrightofmemphis.org/aboutus.htm 

Until next time,
Happy Scrappin!

Monday, August 30, 2010

Zoe's "Scrap-Happy Space"

Hello Scrappers!

I am thrilled to share with you, Zoe's scrap closet, which she fondly calls her "Scrap-Happy-Space".  She with the help of her husband's handy skills, created this scrappy space in a closet in their home and on a budget!  Her husband bought all the plywood and made the shelves and desk.  he used shelf brackets mounted to the wall, to hang the shelves.  Zoe bought all the cubbies at Micheals to complete her closet scrap happy space.

Another possibility is to use 3/4" MDF (4'x8' ft sheet around $25) instead of plywood.  MDF (medium density fiberboard) is a great product and you see it used on HGTV all the time for low cost projects.  It is a strong, durable material and I use it for all my building projects.

Another option would be to buy ready-made shelves (usually found found in the closet section at hardwood stores). Using these ready made shelves would not require the need for extra tools and painting.  This would be a bit higher in cost and you would not have the custom fit that Zoe's space has, but if you don't have the tools and a handy husband, this would certainly work.  All you need are a few basic tools, like a hammer, drill bit, wall anchors, and a drill.  I believe every woman should have some basic tools and know how to use them! 
Zoe's space is a perfect example of how you can have a great scrapbook space in a closet.  Most of us would prefer to have a whole room, but when space is limited, this would be a perfect solution!   One of the benefits to a scrap closet is when you are in the middle of a project and need to stop, you can simply close the doors!  Not only is this practical, but it is beautiful. 


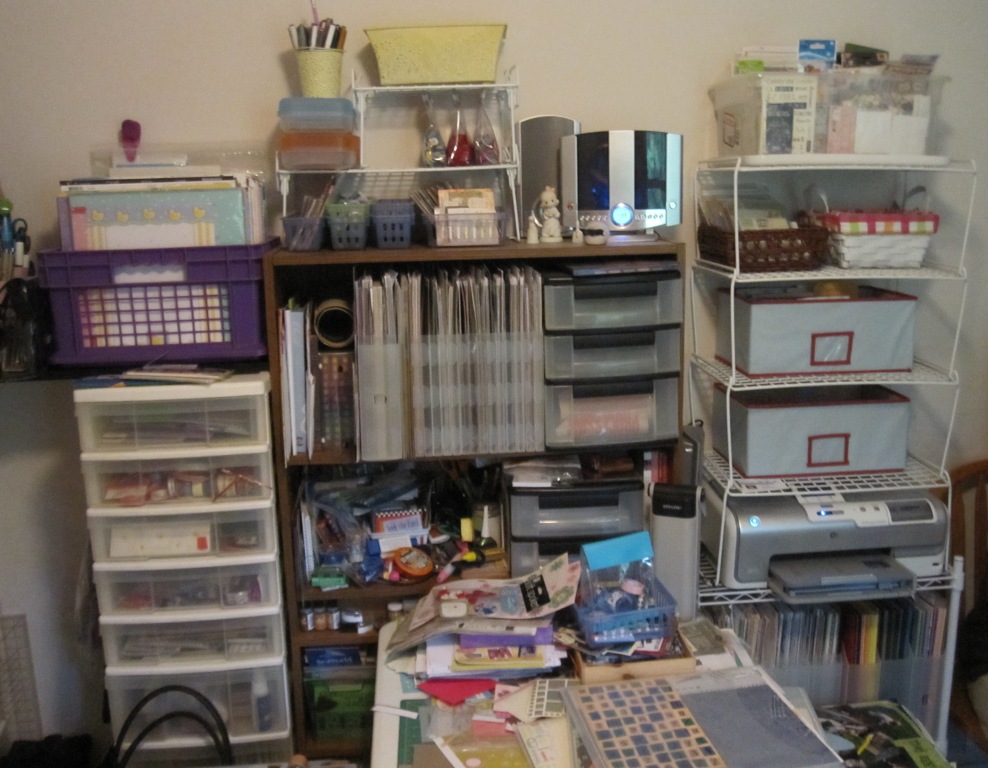
As you can see, Zoe has a place for everything and she found some great buys on the storage containers and boxes.  She got the colorful boxes, she stores stickers and embellishments, at Ross for $6 each. The two large glass jars with ribbons in them were found at a garage sale for $1 each.  The cute, altered lunch box (on tops of the purple box) was from a dear friend.  How cute is that?  The row of clear plastic boxes below the lower shelf are baby food containers, where she stores her embordery thread.  Since she has a sweet 9-month old baby girl, that has to eat anyway, these were free!  You are one very creative lady, Zoe!

On the desktop, she keeps her Personal Cricut on the left side of her desk and her sewing machine on the right. Which leaves the middle area open for all her workspace. She has metal wall mounts attached to wall to hold up her shelves and used them to attach magnetic metal spice containers right to one of them! I love this idea. What would be a totally useless space and not so attractive, she has made an asset. Behind the sewing machine, Zoe has a magazine holders to hold all her small paper stacks, tools, and current photos she wants to scrap.


On her work space, Zoe keeps special momentos that inspire her, such as the red Z, a rock with the word "imagine" on it, and her very close to her heart photo of her and her dad.  How sweet is that?

Zoe has put cubbies on both sides of the shelf above her work area.  On the left side she has slots to hold her acrylic stamps in a binder and shelfs to hold embellishments and paints.  You can buy the small cubed shelves at Micheal's for about $30 each, but wait until you have a coupon for 40-50% off and you will have a real bargain!  Zoe has several of these cubbies and they are cute and works well for all her storage needs.  The cute, green boxes she found at Goodwill for $1 each.  As you can see, she has more of the magnetic spice containers on the wall.
To save on space she has created a binder where she stores her all her acrylic stamps, embossing folders and dies.  She actually got these plastic sheets she used to put her acrylic stamps on, and pocketed plastic binder sheets at her work place and repurposed them to fit her needs.  I wonder if you can get me some of these?!?  Just kidding! Well, maybe not.


On the right side she keeps all her 12x12 papers, paper pads, and finished layouts.  In the orange folder is where she keeps all her paper scraps.  I am truly amazed at her organization in her small space!


Even under her desk she has utilized the space well.  On the right, she has a rolling cart with drawers to keep miscellanous supplies such as bigger tools, cards, envelopes, beads, and brads, etc.   She uses this cart to wheel out to dining room when she has crops.  On the left she has these stackable cubes to store more of her supplies.  


In the top stackable cubes under her desk, she has a "thinking spot" where she keeps her layouts she is currently working on.  I like this concept and will have to create a "thinking spot" of my own!


Her ribbon drawer is her "eye candy" drawer.  She is converting her storage from spools to cards to have more room.  There is not much prettier thing to a scrapbooker than a nice colorful drawer of ribbon.


Ink and stamp storage in these drawers. She also has a scrap drawer where in one quick sweep she can put it all in one drawer after she is finished working on a layout.


What a beautiful space, Zoe and her husband, have created.  Thank you so much for sharing it with us.  I love it and know there is somone out there who will be so inspired that they will have to create their own "scrap-happy space" scrap closet.

Check out Zoe's blog

Until next time,
Happy Scrappin!

Friday, August 27, 2010

Check out Before Photos of Carolyn's Scrapbook Rooms

Hello Scrappers!

I went to see Carolyn on Wednesday and she is so excited about her new scrapbook space! We both had notes ready to go when I arrived and got right to work. We discussed several things, such as; how she scrapbooks, what her needs are, how she currently stores her items, and much more. We measured her new room and it is roughly 24 feet long x14 feet wide on one side, and on the other side the wall is about 30 feet long.


Carolyn was a very good sport to let me take photos of her room upstairs as is--before any of the furniture was moved out--and the fact that her closet rod had broken and all the clothes got piled onto the bed!  So thank you, Carolyn, for letting me do that!  You are such a dear, sweet lady.  Carolyn is lucky enough to have family who have promised to paint her room for her over the next couple of weeks.  She is wanting an apple green color on all the walls with white on all the ceiling.  We spent today trying to find her "perfect" apple green, so I guess we will wait and see what it really turns out to be!  LOL  That's for you, Carolyn hehe.


In Caroyln's current scrapbook room, there are several pieces that are working well for her, such as three small black bookshelves.  The bookshelves are approximately 31" H x 30" W x 11.5" D, and she got them at Wal-Mart for under $20 each.  We decided to work with these shelves and went to our local Wal-Mart and bought 4 more for $15 each (got to love the roll-backs at Wal-Mart)!  We plan to line these shelves up along the wall opposite the stairs and put a shelf over them all, and hopefully give them a built-in look.  We have not figured out exactly how to accomplish that, but that is out plan.  Any suggestions you might have or photos of how you may have accomplished this in your own space would be welcome.

Carolyn has several 3-drawer Sterite containers, and in these drawers she stores some of her supplies by theme, and some by designer series.  We are still contemplating where to put these and welcome any suggestions you have, since they also work very well for her scrapbooking needs.  In her current space, all she has to do is turn around to get her supplies, so with this much larger space upstairs, it will be an adjustment for her to have to move across the room to get her supplies.  She also has a small folding table she currently works on and has two more tables like it, which we were thinking we could use to create a crop area in the center of the room. 

To my surprise, she purchased a black kitchen island at Big Lots to use as her main work area for $229.  It has a butcher block top with a inlaid piece of granite off to one side.  On one of the long sides there is a section that can be flipped up to add more work space when needed.  We are thinking of placing the island in front of the window, out towards the middle of the room.
She has a computer desk that she would like to put up there, but we are not sure whether it can be disassembled and reassembled, or where it would fit.  Another interesting piece she has is a metal gray office cabinet that she keeps in her closet.   It has 30 drawers in it and this is where she keeps all her memorabilia that inspires her layouts. Each drawer has a tag slot to let her know what is in each drawer. (Not shown in photos).
She uses large plastic project boxes that come in multiple colors with handles, to store more of her supplies and projects she is currently working on. Her existing tiny room serves a lot of functions and I am amazed how well she has managed in that small space, especially considering how many supplies she has!  She does plan to purge before moving upstairs, so we will see what she has and what I can buy from her!  Let's hope she purges some good stuff!


Debbie's Space
 
It turns out that she is going to create a second workspace for her daughter, Debbie, in the space around the stairwell.  Debbie already has many nice white storage cubes, with drawers, paper shelves, that she got from Michaels.  We are going to put all the cubes stacked in the same place she now has her stuffed animals.  On the other half wall facing the stairwell, we will put her a nice L-shaped work area, using more cubes as a table base.  As you can see below, Debbie has a good amount of supplies herself, and it looks as if these pieces should fit quite nicely into this area.

I have to admit is is a bit overwhelming to help someone else figure out their scrapbook room and to make sure there is adequate storage for all her supplies!  We have a big challenge before us, but we are both very excited about the process and the end result!  We are both looking forward to your suggestions and ideas.  You can post a comment below or email any ideas, photos or drawings you have to shargod@gmail.com

Until the next time,
Happy Scrappin!